Most homeowners judge a roof by color and style. Roofers judge it by pattern.
Shingles are not simply layered randomly across a roof surface. Every high-performing roof follows a deliberate architectural shingle installation pattern—one that controls water flow, distributes stress, resists wind uplift, and ensures long-term durability. When patterning, alignment, and exposure are correct, shingles work together as a system. When they’re rushed or misaligned, even premium materials can fail early.
In this article, we’ll break down how shingle patterns really work, why the shingle stagger pattern matters more than most people realize, how manufacturer installation specs protect warranties, and why the final ridge cap layout is just as important as the first row at the eaves. This isn’t a technical deep dive—it’s a practical guide to understanding how workmanship affects roof performance.
Why Shingle Patterns Matter More Than Appearance
At first glance, architectural shingles look dimensional and random by design. But the “random” appearance is carefully engineered. Each course overlaps the one below at a specific offset, ensuring that:
- Water sheds efficiently
- Seams don’t align vertically
- Fasteners remain protected
- Wind cannot easily lift edges
When patterns are incorrect, three problems usually follow:
- Water intrusion risk increases
- Wind resistance decreases
- Visual inconsistencies appear over time
As the National Roofing Contractors Association notes in its installation guidance, correct layout is fundamental to both performance and warranty protection. In other words, patterning isn’t decorative—it’s structural.
Understanding the Architectural Shingle Installation Pattern
Architectural shingles (also called dimensional shingles) differ from traditional three-tab shingles. They’re thicker, layered, and engineered for enhanced durability. But they still rely on precise installation patterns.
A proper architectural shingle installation pattern includes:
- Consistent horizontal alignment
- Correct vertical offset between courses
- Accurate exposure (the portion of shingle visible after installation)
- Secure fastening within the designated nail strip
Architectural shingles are designed to disguise minor variations, but that doesn’t mean placement is flexible. Precision still matters.
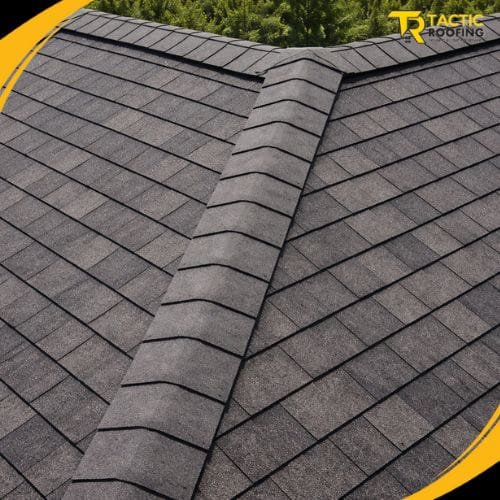
The Shingle Stagger Pattern: Why Offsetting Is Critical
One of the most important aspects of shingle layout is staggering.
The shingle stagger pattern ensures that vertical joints between shingles do not line up from one course to the next. If they did, water would have a direct path through the system.
Proper staggering:
- Breaks up water pathways
- Distributes wind pressure
- Prevents structural weak lines
- Improves overall aesthetic flow
Poor staggering, on the other hand, can create subtle vertical lines that become visible over time—especially as shingles age and settle.
Exposure: The Detail That Controls Water Flow
“Exposure” refers to how much of each shingle is visible after installation. It’s determined by manufacturer design and specified precisely in installation guides.
Too much exposure:
- Reduces overlap
- Exposes more surface to wind uplift
- Increases leak risk
Too little exposure:
- Creates visual inconsistency
- Alters drainage behavior
- Wastes materials
This is where following manufacturer installation specs becomes critical. Manufacturers test their shingles under specific exposure measurements. Deviating from these guidelines may void warranties or compromise performance.
Manufacturer Installation Specs: Why They Exist
Every major roofing manufacturer publishes detailed installation specifications, covering:
- Starter strip placement
- Nail count and location
- Exposure measurement
- Valley treatment
- Ridge cap layout
These aren’t suggestions. They are performance requirements.
According to International Code Council, proper installation following manufacturer guidelines is essential for ensuring structural integrity and weather resistance. When contractors improvise patterns or ignore spacing rules, the entire system is weakened.
Pattern Alignment and Long-Term Performance
Shingle alignment isn’t just about straight lines. It influences how the roof ages.
Well-aligned shingles:
- Wear evenly
- Seal properly along adhesive strips
- Resist curling
- Maintain consistent drainage channels
Poor alignment:
- Creates uneven shadow lines
- Leads to early granule loss in high-stress areas
- Encourages wind uplift at misaligned seams
Over time, these small inconsistencies become visible—and costly.
Ridge Cap Layout: The Finishing Detail That Protects Everything
Many homeowners overlook the ridge cap layout, but it’s one of the most critical details in the entire roofing system.
Ridge caps:
- Seal the peak of the roof
- Protect the final shingle edges
- Provide wind resistance at the highest exposure point
- Cover ventilation systems in ridge-vent assemblies
Proper ridge cap installation includes:
- Correct overlap direction
- Secure fastening
- Alignment with prevailing wind patterns
- Consistent spacing and exposure
A poorly installed ridge cap can compromise an otherwise flawless shingle field.
Wind Resistance and Pattern Geometry
Wind doesn’t hit a roof evenly. It lifts edges and exploits seams. Proper architectural patterning:
- Reduces aligned vertical seams
- Distributes uplift forces
- Protects adhesive seal zones
- Strengthens shingle interlock behavior
This matters especially in areas prone to storms or high gust conditions.
In discussions about wind resistance—similar to those in Common Myths About Roof Repairs—many homeowners assume thicker shingles alone prevent blow-offs. In reality, pattern accuracy and fastener placement are equally important.
Common Patterning Mistakes to Avoid
Even experienced installers can make errors under time pressure.
Frequent mistakes include:
- Repeating the same offset instead of alternating
- Misaligning starter strips
- Ignoring chalk lines for alignment
- Driving nails outside designated zones
- Cutting ridge caps unevenly
These errors often stem from rushing the layout phase. But in roofing, precision at the beginning determines performance at the end.
Why Workmanship Matters More Than Marketing
Architectural shingles are engineered for performance—but only when installed correctly.
A premium product cannot compensate for:
- Crooked layout lines
- Improper staggering
- Incorrect exposure
- Inconsistent ridge cap finishing
This connects directly to lessons found in Roof Repair Mistakes You Should Avoid. Many early failures attributed to “bad shingles” are actually layout or fastening errors.
Good workmanship doesn’t just make the roof look better—it makes it last longer.
Visual Symmetry vs Functional Performance
Homeowners sometimes prioritize appearance over function. But the two are connected.
A properly installed architectural shingle installation pattern:
- Creates natural shadow lines
- Maintains consistent spacing
- Supports balanced drainage
- Protects vulnerable seams
When symmetry is off, water paths are often compromised as well.
What Homeowners Should Look For
Even from the ground, you can assess pattern quality.
Look for:
- Straight horizontal lines
- No repeating vertical seams
- Clean ridge cap alignment
- Even exposure across the surface
- No lifted or uneven tabs
If the roof looks “off” visually, there’s often a performance issue behind it.
Final Thoughts: Patterns That Protect
Roofing isn’t random. It’s geometry.
The architectural shingle installation pattern determines how water moves, how wind pressure distributes, and how the roof ages over decades. From the first starter strip to the final ridge cap, pattern discipline transforms a collection of shingles into a durable roofing system.
In roofing, details aren’t decorative—they’re protective. And patterning is one of the most important details of all.