
Adding something “small” to a roof—like a satellite dish, a security camera mount, or new HVAC line routing—can create one of the biggest long-term risks in a roofing system: an unprotected hole. For Ontario homeowners, the issue isn’t whether accessories are useful (they are). The issue is whether the installation respects roof penetration best practices so water can’t find a path into the roof deck, insulation, or framing.
Most roof leaks don’t happen because shingles suddenly “stop working.” They happen because a third-party installer created a weak point—then tried to make it watertight with caulk. That’s why this guide is written as homeowner protection: what to approve, what to refuse, and how to ensure any new rooftop accessory gets installed safely without compromising the roof.
Building science experts put it bluntly:
“Flashings are needed wherever a drainage plane is… interrupted… [including] penetrations of the drainage plane.”
That sentence is the foundation of this entire article.
Why Third-Party Roof Installs Go Wrong
Satellite and HVAC crews are skilled at their trade, but they’re often not trained in water-shedding roof detailing. Many installs fail for predictable reasons:
- Penetrations placed in the wrong location (valleys, low spots, near chimney crickets)
- Fasteners through shingles without proper flashing
- Sealant-only “waterproofing”
- Incompatible materials (sealants that don’t bond long-term to asphalt or metal)
- No documentation, leaving you with warranty questions later
The result is usually not an immediate leak. Water may take months—or one major storm—to show up inside.
The Four Rules of Roof Penetration Best Practices
If you remember nothing else, remember these four rules:
- Avoid penetrations when a non-penetrating option exists.
- If you must penetrate, flash it—don’t just seal it.
- Keep penetrations out of high-water zones.
- Coordinate the accessory installer with a roofer (especially on newer roofs).
A commercial roofing guidance article summarizes a key principle homeowners can apply too:
“Roof penetrations should be flashed in accordance with the roof system manufacturer’s instructions.”
That’s not just best practice—it’s often the difference between “fine for a year” and “leaks forever.”
Where Accessories Commonly Create Roof Problems
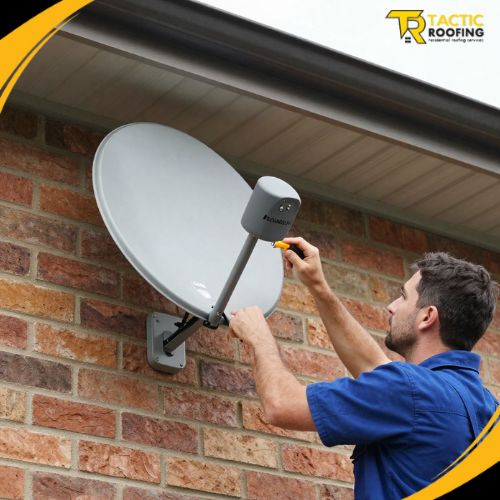
Satellite dishes and antennas
Problems usually come from:
- Lag screws into shingles
- Mounts installed near ridges without proper flashing
- Cables routed under shingles or through fascia without drip loops
Heat pumps, mini-splits, and HVAC line sets
The line set itself is not the issue. The issues are:
- Poorly planned routing that forces roof penetrations
- Improvised pipe boots or “stuffed” sealant around holes
- Condensate drains routed where they freeze or back up
Security cameras, lights, and small roof mounts
These typically fail because installers assume “small hole = small risk,” then skip flashing.
The Safest Options: Roof Mounts That Don’t Penetrate
Before anyone drills, ask: can this be installed without puncturing the roof?
Safer alternatives often include:
- Wall or fascia mounts (installed into framing, properly sealed and flashed at the wall plane)
- Non-penetrating mounts (more common on flat roofs, using ballast or engineered clamping systems)
- Gable-end mounting for antennas (keeping the roof surface untouched)
This is where thoughtful roof mounts selection pays off. If the accessory can be secured to structure without a roof hole, you eliminate the highest-risk failure mode.
If a Roof Penetration Is Unavoidable, Here’s What “Correct” Looks Like
1) Choose the right location
Good locations are:
- Higher on the roof plane (not at the eaves where ice and runoff concentrate)
- Away from valleys, chimney backpans, and sidewall intersections
- Clear of areas with heavy snow drift and debris accumulation
Bad locations are:
- Valleys (high water volume)
- Directly behind chimneys (pooling and ice)
- Low-slope transitions where water slows down
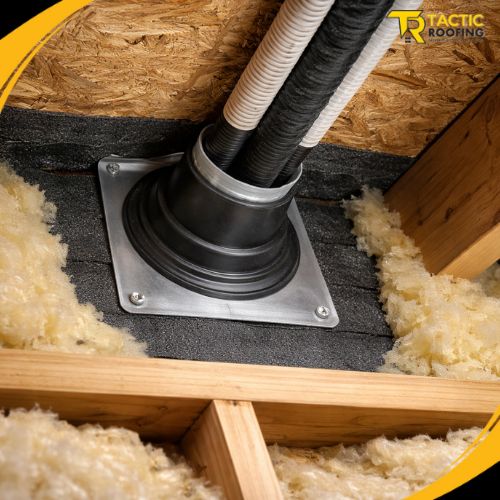
2) Use purpose-built flashing—not improvised sealant
Proper flashing might include:
- Pipe boots/vent flashings for round penetrations
- Pre-manufactured flashing kits for specific mounts
- Step flashing + counterflashing principles at vertical transitions
- Underlayment integration in “shingle fashion” (laps that shed water)
This ties directly to The Role of Roof Flashing in Leak Prevention: water management works when details always direct water “down and out,” not sideways into seams.
3) Integrate with underlayment layers
A penetration that sits on top of shingles with sealant is not integrated. A properly flashed penetration is layered so water cannot get behind it, even if sealant ages.
4) Fasteners must be protected
Fasteners should not sit in a direct water path and should be installed where the flashing design expects them. Exposed fasteners should be minimized and sealed appropriately as a secondary measure—not the primary defense.
Sealing Roof Penetrations: What Sealant Can and Cannot Do
Homeowners are often shown a thick bead of caulk and told “it’s sealed.” Here’s the reality:
Sealant can:
- Fill small gaps as a backup measure
- Improve air-tightness when used correctly with flashing
- Help protect fasteners in low-water areas
Sealant cannot:
- Replace flashing geometry
- Handle standing water long-term
- Stay elastic forever under UV exposure and freeze–thaw cycles
So sealing roof penetrations should be treated as “secondary insurance,” not the main strategy.
HVAC Line Sets: The Most Common “Invisible Leak” Scenario
Mini-splits and heat pumps are increasing across Ontario, and they bring a common risk: line-set penetrations. A safe approach usually includes:
- Routing through a wall when possible (with proper wall flashing and drip loops)
- If routing must go through the roof, using a purpose-built roof jack/boot designed for the roof type
- Ensuring the penetration is high enough above the roof plane and not in a snow trap zone
- Supporting the line set so it doesn’t vibrate, rub shingles, or pull on the flashing over time
Also consider winter conditions: condensate lines and sleeves can freeze. If the design causes water to back up near a penetration, you’ve created a chronic moisture problem.
Satellite Dish Installs: What to Require From the Installer
If a dish must go on the roof (not your first choice), require:
- A mount designed for roofing applications (not a generic bracket)
- Flashing that matches roof material and slope
- Cable routing with drip loops and protected entry points
- Photos of the final flashing detail for your records
If the installer says “we just use roofing tar,” treat that as a stop sign.
What Homeowners Should Ask Before Approving Rooftop Accessories Installation
Use this short checklist before you say yes:
- Where exactly will the accessory be mounted? (Show me on the roof.)
- Will the installation require any roof penetrations?
- What flashing system will be used? (Not “caulk,” not “tar.”)
- Who restores shingles/underlayment around the penetration?
- Will this affect my roof warranty?
- Will you provide install photos?
This is the homeowner-protection part of rooftop accessories installation: you’re not being difficult—you’re preventing the most common avoidable leak.
The “DIY Roof Repair” Trap With Accessories
Many accessory leaks begin with a DIY mindset: “It’s just a small bracket.” But roofs punish shortcuts. If you’ve read DIY Roof Repair: What You Shouldn’t, the message is consistent: penetrations are not the place to experiment.
Even if you’re comfortable with tools, roof work introduces:
- fall risk
- hidden damage risk (breaking shingle seals, cracking shingles in cold weather)
- long-term leak risk from incorrect layering
If you must DIY anything, keep it to non-penetrating, non-roof-surface solutions—then leave roof detailing to a roofer.
Why Quick Action Matters if a Penetration Was Done Wrong
If you suspect a bad install, don’t wait for the ceiling stain. Early action can prevent:
- soaked insulation and moldy attic conditions
- deck rot around the hole
- repeated “mystery leaks” during wind-driven rain
- larger repairs that require shingle removal
This connects to The Cost of Neglecting Roof Maintenance: small defects become expensive because water spreads quietly before it shows itself.
Bottom Line: Protect the Roof System, Not Just the Accessory
Accessories come and go—satellite dishes get removed, cameras get upgraded, HVAC systems get replaced. But the roof is a long-term system. Following roof penetration best practices means every new add-on respects drainage, flashing, and layering so your roof remains durable for years.
If an installer can’t explain how the penetration is flashed and integrated, the safest move is to pause, coordinate with a roofer, and do it once—correctly.