If you ask roofers where leaks most often begin, the answer is rarely “the shingles.” More often, it’s a small rubber or metal component that most homeowners never notice until water stains appear on the ceiling. Plumbing vent boot replacement is one of the most common—and preventable—roof repairs, because vent boots tend to fail earlier than almost any other roof part.
A plumbing vent boot (also called vent pipe flashing) seals the point where a plumbing vent pipe passes through the roof. It looks simple, but it lives at the intersection of heat, UV exposure, movement, and water flow. When it fails, leaks can travel far from the actual problem, making diagnosis frustrating and repairs more expensive than they need to be.
This article is a practical, high-intent guide. You’ll learn what vent boot failure looks like, why it happens so often, how it leads to leaks, and why correct installation and sealing matter more than most homeowners realize.
What a Plumbing Vent Boot Actually Does
Every home has plumbing vents that release sewer gases and regulate pressure in the drainage system. Those pipes must exit the roof—and every penetration through a roof is a potential leak path.
A plumbing vent boot is designed to:
- Seal tightly around the vent pipe
- Direct water onto the roof surface, not under it
- Move with thermal expansion and contraction
- Integrate with shingles and underlayment
In theory, it’s a simple task. In practice, this small component is under constant stress, which is why vent flashing failure is so common.
What Vent Boot Failure Looks Like (Real-World Signs)
Many homeowners don’t recognize a failing vent boot because the symptoms don’t always appear directly below the pipe.
Common exterior signs:
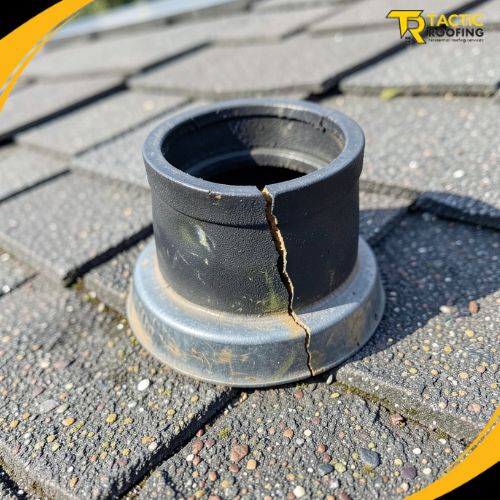
- Cracks or splits in the rubber collar
- Brittle, chalky, or faded material
- Gaps where the boot meets the pipe
- Lifted or distorted flashing flange
Common interior signs:
- Water stains near bathrooms or kitchens
- Damp attic insulation around vent pipes
- Moldy odors in upper floors
- Leaks that appear only during heavy rain or snow melt
One of the most misleading aspects of roof boot cracking is timing. A boot may look “mostly intact” but leak only when rain is driven sideways by wind or when snow melts slowly around the pipe.
Why Plumbing Vent Boots Fail First
Vent boots fail early because they are exposed to more stress than most roofing components.
1. UV and Heat Degradation
Rubber-based boots—especially older styles—are constantly exposed to sunlight. Over time, UV radiation dries out the material, causing it to crack and lose elasticity.
The U.S. Environmental Protection Agency notes that prolonged UV exposure “accelerates the breakdown of many polymer materials, leading to brittleness and surface cracking.” Vent boots sit in direct sun all day, every day.
2. Thermal Movement
Vent pipes expand and contract as temperatures change. The roof deck and shingles move differently. The boot must absorb this movement repeatedly, year after year.
When the material hardens with age, it can no longer flex—and cracks form at the pipe collar.
3. Poor Material Selection
Low-quality rubber boots may be cheaper upfront, but they often fail within a few years. Modern neoprene roof boot designs last longer, but only when installed correctly.
4. Improper Installation
Even the best boot will fail prematurely if:
- It’s cut too tight around the pipe
- Nails are placed in water channels
- Sealant is relied on instead of proper overlap
- The flashing flange isn’t integrated with shingles
The National Roofing Contractors Association has stated that “penetrations are among the most common sources of roof leaks, largely due to improper flashing installation.” Vent boots fall squarely into that category.
Why Leaks From Vent Boots Are So Deceptive
Water rarely drips straight down from the point of entry. Once it gets under the roof surface, it can:
- Travel along the vent pipe
- Run down rafters
- Pool on attic insulation
- Appear several feet away from the actual failure
This is why many homeowners pursue repeated roof repair for leaks without ever addressing the real cause. The leak stops temporarily—until the next storm.
Vent Pipe Flashing vs. Sealant: Why Caulking Is Not a Fix
One of the most common mistakes is trying to “fix” a vent boot with roof cement or caulk.
Sealant can:
- Crack in cold weather
- Soften and slide in heat
- Trap moisture under the boot
Caulk may buy time, but it does not restore flexibility or structural integrity. In many cases, sealing over a cracked boot actually accelerates failure by trapping water against degraded material.
Proper plumbing vent boot replacement means removing the old flashing and installing a new boot that integrates with the roofing system—not patching around it.
Types of Vent Boots (And Their Failure Patterns)
Rubber or neoprene boots
- Flexible and common on asphalt roofs
- Vulnerable to UV aging
- Best replaced proactively before visible cracking
Metal boots with rubber collars
- More durable flange
- Rubber collar still subject to cracking
- Failure often occurs at the collar-to-metal junction
All-metal boots
- Long lifespan
- Require precise installation
- Less forgiving of movement
Each type has advantages, but none are immune to failure if installation details are wrong.
Why Proper Sealing and Integration Matter
Vent boots don’t work alone. They rely on:
- Underlayment laps
- Shingle placement
- Nail positioning
- Water-shedding geometry
In The Role of Roof Flashing in Leak Prevention, flashing is described as a system, not a single component. Vent boots are part of that system.
If the boot flange is installed over underlayment instead of under it—or if shingles aren’t layered correctly—water will eventually find a way underneath.
When Vent Boot Replacement Is Necessary (Not Optional)
Replacement is strongly recommended when:
- Cracks or splits are visible
- The boot feels hard or brittle
- Leaks recur near plumbing vents
- The roof is being replaced
Replacing a vent boot during a reroof is inexpensive. Replacing it later requires disturbing shingles, increasing labor cost and risk of cosmetic mismatch.
This is why experienced roofers replace vent boots proactively, even if they “aren’t leaking yet.”
What Homeowners Should Look For in Workmanship
You don’t need to climb on the roof to evaluate quality.
Signs of good workmanship:
- Boot sits flat, with no buckling
- Shingles overlap the flange correctly
- No exposed nails in water paths
- Clean, minimal use of sealant
Red flags:
- Heavy caulking around the pipe
- Crooked or uneven boot placement
- Shingles cut too tight or too loose around the pipe
These details determine whether the boot lasts 5 years—or 20.
Why This Small Part Causes Big Damage
A failed vent boot can lead to:
- Mold growth in attic insulation
- Rotting roof decking
- Ceiling and drywall damage
- Repeated leak repairs that never solve the problem
The cost difference between early replacement and late discovery can be dramatic.
In roofing, the smallest penetrations often create the biggest problems.
Final Perspective: Fix the Weakest Link First
Plumbing vent boots fail first because they live in the harshest conditions and are often treated as minor accessories instead of critical flashing components. But roofs don’t leak because of “bad luck.” They leak because water exploits the weakest detail.
Plumbing vent boot replacement is one of the simplest, most cost-effective ways to prevent recurring leaks—when it’s done correctly and at the right time.
For homeowners, knowing what vent boot failure looks like and understanding why proper sealing matters can save years of frustration and unnecessary repairs. Sometimes the difference between a dry home and a chronic leak is a component no bigger than a dinner plate.