Most roofing failures don’t start in the middle of the roof. They start at the edges.
Homeowners often focus on shingle color, brand, or warranty length, assuming the visible surface determines performance. In reality, some of the most expensive and frustrating roof problems trace back to two small, easily overlooked components: starter shingles and drip edge. When these details are missing, poorly installed, or misunderstood, even a brand-new roof can begin failing years—sometimes decades—earlier than expected.
This article takes a detail-driven approach. We’ll explain exactly what starter shingles and drip edge do, why edge detailing matters so much, how poor workmanship leads to premature roof failure, and what homeowners should look for when evaluating a roofing job.
Why Roof Edges Fail First
Roof edges are where multiple forces collide:
- Gravity pulling water downward
- Wind pushing rain sideways and upward
- Capillary action drawing moisture under materials
- Thermal expansion and contraction stressing fasteners
- Ice buildup and melt cycles at the eaves
Because of this, the roof edge is one of the most vulnerable zones in the entire roofing system. That’s why roof edge protection isn’t optional—it’s fundamental.
Two components work together here:
- Starter shingles (also called a shingle starter strip)
- Drip edge flashing
When either is missing or poorly installed, water finds a way in.
What Starter Shingles Actually Do
Starter shingles are installed along the eaves and rakes before the first course of field shingles. Their job isn’t decorative—it’s functional.
Core functions of a shingle starter strip
- Seal the first shingle course
Starter shingles include factory-applied adhesive that bonds with the first row of shingles. This creates a wind-resistant seal at the roof’s most exposed edge. - Provide proper overhang alignment
They allow shingles to overhang the roof edge correctly, preventing water from curling back under the shingle. - Block wind uplift
Without a starter strip, wind can catch the bottom edge of shingles and peel them upward over time. - Control water flow at the eaves
Starter shingles direct water cleanly into the gutter instead of behind it.
Despite their importance, starter shingles are one of the most commonly skipped or improvised components on low-quality roofing jobs.
Common Starter Shingle Installation Mistakes
Using cut shingles instead of real starters
Some contractors cut tabs off standard shingles and use them as starters. While this may look acceptable, it often lacks the correct adhesive placement and wind resistance.
Incorrect adhesive orientation
Starter strips must be installed with the adhesive facing the correct direction. Reversing them defeats their sealing function.
No starter on rake edges
Rake edges (the sloped sides of the roof) are highly exposed to wind-driven rain. Skipping starter strips here leads to edge lifting and blow-offs.
Inadequate overhang
Too little overhang causes water to run behind the fascia; too much causes sagging and cracking. Precision matters.
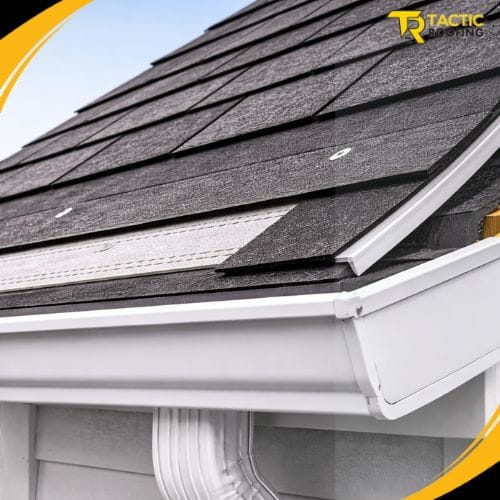
What Drip Edge Does (and Why It’s Not Just “Metal Trim”)
Drip edge is a metal flashing installed along the eaves and rakes. Its purpose goes far beyond appearance.
Key functions of drip edge installation
- Directs water away from the fascia and roof deck
- Prevents capillary water from wicking under shingles
- Protects exposed decking edges from rot
- Reinforces the roof edge against wind-driven rain
Without drip edge, water doesn’t drip cleanly—it clings, curls, and migrates upward into the roof system.
According to the Insurance Institute for Business & Home Safety,
“Properly installed drip edge flashing significantly reduces the risk of water intrusion at roof edges during wind-driven rain events.”
That’s not cosmetic—that’s structural protection.
Where Drip Edge Must Be Installed (and How)
Correct placement matters just as much as having drip edge at all.
At the eaves
- Drip edge goes under the underlayment
- This ensures water flows onto the metal and into the gutter
At the rakes
- Drip edge goes over the underlayment
- This blocks wind-driven rain from pushing underneath
This sequencing detail is frequently misunderstood and incorrectly executed—often leading to leaks that appear far from the roof edge.
How Poor Edge Detailing Causes Premature Roof Failure
When starter shingles and drip edge are missing or installed incorrectly, problems rarely appear immediately. Instead, failure happens gradually:
- Moisture repeatedly wets the roof deck edge
- Fascia boards begin to rot
- Nails lose holding power
- Shingles curl, crack, or lift
- Ice dams worsen due to trapped water
- Leaks appear inside walls—not ceilings
These failures are often misdiagnosed as “shingle defects” when the real issue is edge detailing.
As the National Roofing Contractors Association has stated,
“The majority of early roof failures are related to improper installation rather than material defects.”
Starter shingles and drip edge are prime examples.
Starter Shingles, Drip Edge, and Eave Protection
Eaves are ground zero for roof damage.
This is where:
- Ice dams form
- Snow melt refreezes
- Water backs up under shingles
Proper eave protection requires coordination between:
- Ice and water membrane
- Starter shingles
- Drip edge
- Correct shingle overhang
If any one of these is missing or poorly integrated, the entire edge assembly becomes vulnerable.
This directly connects to issues discussed in What Causes Roof Leaks and How to Prevent Them—many leaks originate not from failed shingles, but from water bypassing edge defenses.
Interaction With Roof Flashing Systems
Starter shingles and drip edge don’t work alone. They integrate with flashing systems around:
- Valleys
- Sidewalls
- Dormers
- Penetrations
In The Role of Roof Flashing in Leak Prevention, flashing is identified as the primary defense at transitions. Drip edge and starter strips serve as the transition between the roof field and the building envelope.
If these interfaces are sloppy, flashing performance suffers.
Signs of Poor Workmanship Homeowners Can Spot
Even without climbing onto the roof, homeowners can identify red flags.
Visual warning signs
- Shingles flush with the fascia (no overhang)
- No visible metal edge along the roof perimeter
- Uneven or wavy first shingle row
- Exposed nail heads at the roof edge
After a storm
- Shingles lifting at corners
- Granule buildup near gutters
- Water staining on fascia or soffits
These symptoms often point to starter shingle or drip edge issues—not general roof failure.
Why These “Small Details” Save Big Money
Replacing starter shingles or drip edge during installation costs very little compared to:
- Replacing rotted decking
- Repairing interior water damage
- Fixing fascia and soffit rot
- Addressing chronic ice dam leaks
Once shingles are installed, correcting these details often requires partial roof removal—making prevention far cheaper than repair.
What a Quality Roofing Contractor Does Differently
A detail-focused contractor will:
- Use manufacturer-approved starter shingles
- Install starter strips at both eaves and rakes
- Sequence drip edge correctly with underlayment
- Maintain precise shingle overhang
- Integrate edge details with ice & water protection
- Inspect decking edges before installation
They treat roof edges as structural components—not afterthoughts.
Final Perspective: The Roof Fails at Its Weakest Point
A roof doesn’t fail where it’s strongest. It fails where shortcuts were taken.
Starter shingles and drip edge may be invisible from the street, but they quietly determine whether water stays outside or finds a path in. When installed correctly, they extend roof life, improve wind resistance, and prevent the slow, hidden damage that leads to major repairs.
For homeowners, understanding these details isn’t about becoming a roofer—it’s about knowing what quality looks like and what questions to ask before the first shingle goes on.
In roofing, small details aren’t small. They’re everything.